Tuesday, June 30, 2009

Field Trip: Fritz's Pastry


A couple weeks ago I went on a field trip on my day off. It was fabulous. I had received an email a couple days before from Daily Candy. Daily Candy highlights awesome things in Chicago: new things to try, new places to go, trends that are on the up and up. It’s quite handy. Not to mention, their ‘reports’ are brief and witty, making for a good read.

So, Daily Candy told me about this awesome new bakery – in my neighborhood. Since it was a beautiful day, I decided to take a little trip. I visited Fritz Pastry on Diversey.

I ate a Lemon Marcaron (not to be confused with a macaroon). Which tasted like a little bite of lemon bar flavored heaven crossed with some crunchless meringue. Then I had a brioche with hazelnut and milk chocolate. I also had a chocolate croissant.

I liked this bakery. It was warm and well lit. Reasonably priced. Everything tasted very good and the service was great. The only thing I wished for was free wi-fi.


I'm a cherry ghost...

I'm an ocean
I'm all emotion
I'm a cherry ghost
-Wilco

Rainier cherries.
If you haven’t tried them – go out and get them.
I first discovered them the summer I lived in Washington, DC. I went to the Eastern Market (a fabulous farmer’s market with a flea market, an arts and crafts area, and the most gorgeous fresh fruits and veggies) and was mesmerized by these cherries that weren’t a deep red. They’re lighter in color with a sweet, yellow flesh. I ate pounds, upon pounds of the cherries. Until my lips were chapped from the tartness and the corners of my mouth itched from cherry juice.

When Rainier cherries become available every year, a little piece of cherry heaven is sent down from Mother Nature to me. My taste buds do a little dance and I over indulge my cherry passion. Don’t get me wrong, I do like the regular deep red Bing cherries, but I don’t like them as much. When I buy them, it’s to satisfy a hunger and a desire for seasonal fruit, tap dancing taste buds are not a part of the equation.

Maybe I love Rainier cherries so much because they remind me of my skin baking in the summer heat, or strolling through the farmer’s market in DC, or maybe it’s because winter is officially over and there’s fresh, seasonal fruit. Whatever the fact may be, I love these cherries. So I will spend $5 a pound on these suckers.

After I had eaten my way through about two pounds of cherries (single handedly) in less than a week. I decided I should try to make something with them. Hopefully, I wouldn’t eat them all before I figured out what to make.

I decided on a pie, a traditional forum for cherries. I decided I couldn’t just do the cherries because it would way too sweet. I also didn’t want to mess with a pie crust topping, I wanted to try more of a crumble topping. So I hunkered down and did a ton of online recipe research. I used a gluten free pie crust recommended by Shauna James Ahern, Gluten Free Girl, and mixed all these recipes to make the topping.

Cherry Ghost Pie
Pie Crust Ingredients: *Pie crust taken from Shauna James Ahern's Favorite GF Pie Crust
1 cup white rice flour
½ cup sorghum flour
½ cup potato starch
3 TBSP brown rice flour
3 tsp sugar
¼ tsp kosher salt
1 tsp cinnamon
1 stick cold, unsalted butter
1 egg
2 TBSP apple cider vinegar
¼ cup ice water

Topping Ingredients:
¾ cup white rice four
½ cup dark brown sugar
½ cup chopped walnuts
½ cup unsalted butter
¼ tsp kosher salt
¼ cup old fashioned oats

Filling:
1 pound Rainier cherries (approximate)
4 nectarines
1 cup sugar
3 ½ TBSP Gluten Free Flour (I used the pre-mixed Bob’s Red Mill)
1 tsp cinnamon
Pinch of kosher salt

Pie Crust:
Mix the dry ingredients (including the sugar and cinnamon) together in a large bowl. Cut the butter into little pieces (about ½” thick) and drop into the dry ingredients. Using a butter knife, cut the butter into the dry ingredients until it has a mealy consistency. (I used my hands a little bit to help speed the process along. You can also use the food processor to accomplish the desired texture.) Make a well in the dry ingredients. Drop the egg and apple cider vinegar into the well. Stir the egg and vinegar into the dry ingredients gently with a fork. Stirring from the center to the outer edges of the bowl. Once all the ingredients are incorporated, drizzle ice water into the mixture, a little at a time, stirring between each addition. Stir in enough water for the mixture to become dough. You do not want the dough to be too wet!

Lay out a piece of parchment paper and drop the dough onto it. Cover the dough with another piece of parchment paper (in other words a parchment paper sandwich). Gently roll out the dough until it’s thick and the size of a pie plate. Refrigerate the dough as long as possible. Ideally, an entire day/night, but I left mine in for an hour and a half and it came out great.
Remove the dough after it has refrigerated for a while and let it thaw out for about 10-15 minutes.

Roll the dough, between the two layers of parchment, until it’s the size of your pie pan, taking into account the extra area needed for around the sides. I also made the sides about a half inch taller than the pan itself. (I had cut up way too much fruit.) Remove the top layer of parchment, and invert the pie crust into the pie pan. Pinch/crinkle the sides so they fit the pan.

You do not need to pre-bake the pie crust.

Filling:
Pit the cherries and slice them in half. Pit and slice the nectarines. Mix them in a bowl with the sugar, flour, cinnamon and salt. Let the fruit soak in their own juices for a little while (about ten minutes).

On a side note: There are cherry pitters out there. I don’t have one and have never used one, however, it would have been nice. So I did some research on how to pit the cherries easily without a pitting tool. There were suggestions on using a paperclip and a bobby pin. I tried the bobby pin. It was more messy than helpful. I had cherry juice running down to my elbows. The cherries were ripe enough that I could just use my hands to break the cherries open and take the pits out.

Topping:
Thoroughly mix all the topping ingredients together. (AND that’s it – it’s so easy!)


Assembly:

Spoon the filling into the pie crust. Sprinkle the topping over the filling.

Bake in a pre-heated oven at 375 degrees. Cover a jelly roll sheet with tin foil and place pie on top of the pan. (The pan is there to catch any over bubbling juices.) Bake the pie, on the bottom rack, for 20 minutes. After 20 minutes, tent with foil, and continue to bake for about another hour. Check on it periodically, you don’t want the crust to burn. It’s ready when the filling starts to bubble and the topping in a golden brown.

Enjoy!

Things I’d do differently:
I think I let the cherries sit was too long because they were already pretty ripe. Because they were so ripe, I felt like their flavor was weak and got lost. Very muddy flavor-wise. While the nectarines retained a little snap to them and had quite a bit of flavor still.

My sister and brother both thought the cinnamon was a little over powering. I would half the amount of cinnamon in the filling so it wasn’t too much. This may have also been caused by the cherry blandness. I would also only do 3 TBSP of the gluten free flour, instead of 3 ½ TBSP. You could taste the flour a little and GF flour does not taste like regular flour.

For the topping, I would mix all the ingredients together EXCEPT the oats. I would sprinkle the oats on first, directly on top of the fruit, and then sprinkle the rest of the topping over the oats and fruit. I think the oats needed to absorb a little liquid and get a little more tender.

At the end of the day, the pie was good. Much better than my last attempt. I was a little disappointed in the cherry consistency, but it was all trial and error. I couldn’t find any specific Rainier cherry pies out there to use as a study. I would make it again, with a couple modifications. At the end of the day, there is no better fruit than the Rainier cherry. Just go out and try it.

Thursday, June 25, 2009

Pegleg Penny goes to Washington

Trying new things is always difficult. Whether it’s conquering a fear or doing/eating something you’ve never tried before, exploring something new, always has a little bit of hesitation. I’m not going to lie – sometimes fear of the unknown holds you back, but sometimes, if you give it a try it turns into an outstanding experience.

Let me take you back to the spring of 2003. I was offered a fantastic internship for that summer in Washington D.C., working at the Smithsonian. At first I was thrilled, not to mention proud, the fact that I could beat out hundreds of applicants to work at such an institution was pretty impressive – at least to me. However, I wasn’t too sure I wanted to go, it was more to prove to myself that I could get there. My other strong internship possibility in Chicago fell through. I was devastated and freaked out. Which are two very strong emotions that really don’t belong together. They may cause you to spontaneously combust or do very crazy things. Then I panicked and scrambled. I had to find something else. Washington DC, while a romantic idea, took on a whole other dimension of difficult. I had to find a place to live and get my booty out there, not to mention my boyfriend was staying in the area and I didn’t want to leave him. (I know – I’m a total sucker – but I already knew ‘long distance’ was NOT one of our strong suits.) In other words, I was terrified. But I needed a summer job to make a little pocket change, add things to my portfolio of tricks, AND I needed to give a little substance to my resume. So I went to Washington. (Yep, exactly like Mr. Smith.)

Which brings me to buttermilk…I’ve always had sort of ‘Eww’ Factor towards it. I think it’s that spoiled milk thing it’s got going on. It was never really been my thing. So when I picked up the June issue of Gourmet and they had a Raspberry Buttermilk Cake, I was skeptical. It was heavily buttermilky, it wasn’t like the Whoopie pies that just use a little bit. Then I looked at the pictures and my skepticism died down a bit. Then I noticed how easy the recipe sounded, and I considered it a little more. Then I decided to bite the bullet, to conquer my fear of the unknown, and try using buttermilk.

Raspberry Buttermilk Cake (As seen in Gourmet Magazine, June 2009)
Ingredients:
1 cup flour
½ tsp baking powder
½ tsp baking soda
¼ tsp salt
½ stick unsalted butter, melted
2/3 cup plus 1 ½ TBSP sugar, divided
½ tsp pure vanilla extract
1 large egg
½ cup well shaken buttermilk
1 cup fresh raspberries (about 5 oz or one little carton)

Directions
-Preheat your oven to 400 degrees, placing your rack in the middle.
-Butter and flour an 9” round cake pan. Make sure you get all the edges well floured. It makes the cake a lot easier to dump out.
-Beat the butter and 2/3 cup of sugar until pale and fluffy. (Basically, until it’s pretty smooth.) -Then, add the vanilla and beat. Next, add the egg and beat well.
-In a separate bowl, whisk the flour, baking powder, baking soda, and salt together.
-At a low speed on your mixer, mix in the flour with the butter/egg mixture in 3 batches, alternating with the buttermilk. Make sure you begin and end with the flour.
-Spoon the batter into the cake pan. Scatter the raspberries over the top of the cake (there is no need to press them into the batter). Sprinkle the remaining 1 ½ TBSP of sugar over the top of the cake.
-Bake until the cake is golden and a toothpick comes out clean. Approx. 25-30 minutes. Cool in the pan for about ten minutes. Run a butter knife around the edges of the pan to make sure nothing has stuck and dump the cake to finish cooling.

I felt like this was more of a breakfast cake than a dessert cake. It came out very light, fluffy, and delicious, but it didn’t fill that after dinner sweetness craving that I sometimes have. I made two of them and they were easy and came out almost identical. There may be spots that are purpley on the cake. Don’t worry – it’s not mold (I was worried). I think the juices of the berries tend to run when they’re cooked. I had the leftovers a couple times for breakfast and it was a great croissant/toast substitute. It was also a great mid-afternoon snack for my workmates.

At the end of the day, buttermilk may not be so terrible. It has it’s place in the kitchen; I just need to figure out where it is and how to use it so it’s not hiding in a dark corner in my refrigerator, waiting to scare me.

As for Washington DC, maybe I didn't make an impression on it, but it made an impression on me. I ended up renting a room right by Union Station. I had old childhood, wonderful, amazing friends living there that I was able to reconnect with. Part of experiencing that summer I will forever owe to them. I saw the city inside and out. I welcomed my 21st birthday there. I, by no means, will say it was easy. It’s hard to be comfortable in a place when you’re there for such a short period of time. However, once I got out there I was determined to give it a chance – I had no choice. I had friends to go to museums and foreign film screenings with. But I also took the time to go to the farmer’s market, wander the city, go to the zoo, and go see the giant flower at the U.S. Botanic Garden (the one that flowers once every decade and smells like rotting meat) by myself. I took the Metro to Bethesda to go to Trader Joe’s. I went to my first movie screening in the park on the National Mall. It was visually and mentally stimulating. (Even if I came away with nothing to add to my portfolio.) While it may be totally cliché, sometimes you don’t realize how great something will be until you try it. I may not be a big fireworks fan, nor a big 4th of July fan, but nothing can replace the memory of sitting on a cornerstone/planters ledge off the steps of the National Gallery and watching the 4th of July fireworks on the Mall. And to think if I had stayed in the safety of my comfort zone I’d have a little less to talk about and be a lot more boring.

Saturday, June 13, 2009

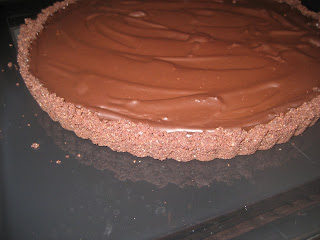
Chocolate Chocolate Tart


I’m writing this post as I struggle through a migraine. It may not be as witty, insightful, or enjoyable to read as usual. I’ve been plagued with migraines since college. Sometimes they’re food induced, other times, like today, they’re stress induced. I didn’t even know I was THAT stressed out until I woke up at 5 am with a pounding headache behind my right eye. It just sits there. Hanging out. Wearing out it’s welcome. It’s 10 am and it’s still going strong. Because I’ve had them for years, I try really hard to not let them alter my life/lifestyle. Sometimes I can’t help it, I just have to lie down, other times I have no choice – I have to work through them. On days like today, where the cold Chicago weather that feels like early April, when it is in fact June, I am determined to not let the fact that I can barely concentrate on the typing I’m doing, ruin a perfectly decent dessert that I’m dying to tell you about.

And so we begin…
Last weekend my roommates and I had a little shindig. The weather was much like today’s – cold, rainy, and miserable. But it didn’t matter. We were going to have a party and we were going to BBQ and we were going to raise money for my roommate to run the marathon with PAWS.

Naturally, I’m still trying to get the tart pan to pay for itself, so I decided to make a tart – among other items. I found a recipe on Epicurious for a Chocolate Glazed Chocolate Tart that seemed easy AND delicious. I decided to try it out with a couple modifications (esp. after reading the reviews). The step are easy, timing wise it takes a little long because you have to wait for everything to cool before moving on.

Chocolate Chocolate Tart (modified from Epicurious)
Crust Ingredients:
127 – Chocolate Teddy Graham Crackers (about ¾ of one box) – When ground it should be about 1 cup of Teddy Graham crumbs
5 TBSP Unsalted butter (melted)
¼ cup of sugar

Filling Ingredients:
1 ¼ cup heavy cream
9 oz Semi-Sweet chocolate (chopped)
2 large eggs
1 tsp Vanilla extract
¼ tsp salt

Glaze Ingredients:
2 TBSP heavy cream
1 ¾ oz Semi-Sweet chocolate (finely chopped)
1 tsp Light Corn Syrup
1 TBSP Cointreau

Making it work:
Preheat the oven to 350 degrees.

Crust:
Grind the Teddy Grahams in the food processor until the consistency is a fine crumb. Stir in the melted butter and the sugar. Dump into the tart pan and spread the crumbs. Press ¾” (or ¾ of the way) up the side of the pan. I stuck one of my metal measuring cups in the freezer for a couple minutes and then pressed it against the side of the crumbs to help the crumbs get into the grooves.

Bake until firm, about 13 minutes. Cool 15-20 minutes before continuing.

Filling:
Chop the 9 oz of chocolate and place in a medium size bowl. Pour the cream in a pan and place it on top of a burner at medium heat. Bring the cream to a boil. Pour the cream over the chopped chocolate and let it stand for 5 minutes (do not stir it!).

After 5 minutes, gently stir the cream/chocolate mixture until it’s smooth.

In a separate bowl, whisk the eggs, vanilla, and salt together. After they’re whisked, stir them into the chocolate/cream mixture.

Pour your completed filling into the tart crust (as long as the crust is cool). Bake until the filling is set, but that a 3” area in the center is still a little wobbly. About 20-25 minutes.

Let the tart cool completely for about an hour.

Glaze:
Chop the chocolate and set it aside. In a small saucepan bring the cream to a boil. Once it’s boiling, remove from the heat, and add the chocolate. Stir until smooth. Stir in the corn syrup and then the Cointreau. (It will have a strong alcohol smell, but don’t worry it’s not intense with the tart.)

Pour the glaze over the top of the cake. Move the cake around to spread it over the top or use a spatula if you’re not quick enough and it’s already a little thick. Let it stand for an hour before serving or refrigerating.

This tart was more than just chocolate it was intense chocolate. The cointreau in the glaze got lost, because the chocolate was so rich. If you’re only a medium chocolate fan, this isn’t for you. The filling tasted like a rich fudge. I would probably make the crust a little thicker next time, because the edge was my favorite part, the crunch of the teddy grahams with the creamy, dense chocolate. It got rave reviews and while it was time consuming was VERY easy to make. My friend Seth, who doesn’t like desserts very much, LOVED it – so it is for sure a crowd pleaser.

I would definitely have a slew of witty comments and colorful descriptions to add to this, but unfortunately, my headache just wants me to get the basics out. I will leave you with this exciting TV throwback it will make up for my lack of creativity. Click Here.

Tuesday, June 9, 2009

Field Trip: Bleeding Heart Bakery


The environment of Bleeding Heart Bakery is what I would assume you’d get when you cross a circus with a bakery. The atmosphere in Bleeding Heart Bakery is one that mixes the giddy excitement and laughter of a trip to the circus with fresh, local, fragrant ingredients. It’s a place where an adult’s eyes grow wide by all the choices in the pastry case and an atmosphere that makes me think that if I fought the law, I would win.

I have been to Bleeding Heart Bakery (BHB) a handful of times in the last year or so. Originally, I was drawn to BHB because they were doing Top Chef themed cupcakes. They would transform the week’s winning dish into a cupcake. (I fell in love with the most delicious Tandori Chicken Cupcake there. Some of you may be thinking 'Eww...gross!' But really, get in touch with your imagination, because they're delicious!)

This is my friend Rich. Rich moved out of the North Side, so our friendship has evolved into revolving around field trips. Since he’s no longer in the neighborhood these trips generally require a little bit of planning and scheduling. Mostly these field trips revolve around food. Girl’s got to eat after all and it doesn’t hurt that Rich works for GrubHub so he knows all these cool places to go. Rich and I have been attempting to make it to BHB together for quite some time. Our plans have been foiled on more than one occasion, mostly due to poor planning, traffic, Chicago’s crazy weather, and work. This past week, however, we finally made it there.

Rich was a little hurt that I’ve been a couple times without him, but he got over it - he didn't have much of a choice on that one. There’s definitely some ‘kitsch’ going on, but what I love about BHB is that it’s a bakery with a little bit of punk. Their desserts look great, but they’ve got an edge. They’ve also mastered the art of using bacon in pastries. (Which you can never go wrong with.)

I ate a Bacon, Egg, and Cheese Teacake (that came with a little vat of maple syrup) and a Veruca Salt cupcake (salty caramel). The cupcake had this little pocket of salty, sweet caramel syrup in the center that oozed out in the perfect mix of gritty salt and super sweet. Rich munched on a savory croissant. (He’s not big on sweets.)

BHB is also awesome because they offer quite a few vegan and gluten free options. While we were there, a woman was picking up a cake for her friend that was in the shape of a giant cupcake. The cake was a chocolate, vegan image of beauty. The woman was very excited, since finding a vegan friendly bakery that makes pieces of edible artwork is a little difficult.

My absolute favorite thing about BHB is that if you lean over the counter a little (discreetly looking at everything in the pastry case), you can peek into their workspace. They’ve got a pirate flag hanging in the room and all kinds of toys and baking gadgets. When you have fun at work, what you produce takes on that feeling. When you walk into BHB you get that feeling and no matter what kind of day you’re having, when you bite into one of their pastries that energy is contagious.

After all, like their t-shirts say: There’s no crying in pastry.

*Normally, I just post on things I have baked. I had such an excellent time at Bleeding Heart Bakery I had to write about it. This blog is ever evolving...

Friday, June 5, 2009

Pain Perdu...The Lost Bread


Last month I made an impulse buy at my grocery store. Part of it was fueled by hunger, part of it was that I didn’t have a list, but mostly it’s because I have this NEED to buy myself ‘a little something’ that is either a treat or something I wouldn’t normally buy to reward myself for being insert your word of choice here. Depending on the day, I’m rewarding myself for being a good person, for making it through work, for not crying when I look at my bank account, for getting a project done, and the list goes on. In a perfect world I would have enough money to buy myself ‘a little something’ AND give $2 to the Streetwise guy (which sometimes I do in fact do), but for me it’s the little victories, the small things that make my day and often times it’s the ‘little somethings’. Back to the point, which is, I don’t quite remember why I rewarded myself with this, but the important thing is that I did. I bought myself my first Gourmet magazine!

Part of what caught my eye about it was these hand cut French fries in a paper cone. I’m not sure why it caught my eye, but at that moment I knew I had found it. It was my ‘little something’ for the day! It looked delicious and mentally stimulating.

I took the magazine home and combed through it. First, I looked at all the pictures. Vivid colors, fresh ingredients, food styling at its peak. Then I noticed how many advertisements are in it, but I let that one slide. Then I got to reading it. I couldn’t get enough of it! Descriptions that made the meals jump off the pages, recipes for everything, I was pleased. After reading it and devouring it piece by piece (metaphorically speaking of course), I really wanted to cook something. I was ready.

My friend Rebecca came over on a Saturday morning for brunch to discuss a ‘business venture’ of ours. The truth is we talked business for about 10 minutes, the rest was devoted to anything but. However, I decided to try the recipe I found for Pain Perdu in the magazine. Pain perdu is a traditional French Toast made from day old or leftover bread. To me, it reminded me more of this Souffle/Quiche hybrid my mom made for us when we were kids. The way it’s cooked here, comes out more casserole type. It has a creamy, dense texture with a crunchy top. It’s the perfect balance for a savory breakfast. The recipe calls for the Pain to be served with poached eggs and a light salad, which sounds great, but is a little more work. I find that the Pain is meal enough, but I have also accompanied it with fried eggs (over hard) and bacon on the side.

For the last couple weeks I’ve been so in love with this recipe, I’ve made it another 2 times. Each time, adding to it and experimenting with the recipe.

The first time I followed/adapted the recipe according to Gourmet magazine (May 2009). And it came out great. Here’s how it works:

Ingredients:
4 slices of a French bread round (1” thick) – the recipe calls for a baguette and to use 6 slices
1 cup whole milk
1 large egg
½ cup grated parmesan
1 TBSP unsalted butter, room temperature
¼ tsp salt
¼ tsp pepper

Preheat the oven to 400 degrees. Make sure the rack is in the middle.
Use the 1 TBSP of butter and peel off the paper, lightly butter a 9-inch pie pan. (Or you can use a 1 qt shallow baking dish.)
Arrange the bread in a single layer in the pan. I cut little slices to fill in the tight areas between the large slices of bread, it was more of a solid layer of bread and it was great.
Whisk together the milk, egg, salt, and pepper.
Pour the milk and egg mixture over the bread.
Sprinkle the cheese over the bread and press on the bread lightly to help it absorb the custard.
Let it stand for about 10 minutes until the liquid is most of the way absorbed. (Recommended standing time 15-30 minutes, but patience in the kitchen is really not my thing.)
Cut the leftover butter into little cubes and dot the top of the bread with the butter.
Bake, uncovered, until puffed and golden, 20-25 minutes.

The first time I made it I was impressed by how easy it was, how delicious it tasted, AND how well the left overs reheated.

The second time I made it I added a teaspoon of Emeril’s BAM Essence to the egg and milk mixture. However, it was kind of lost in the custardy thickness of the bread.

The third time I made it, I double the recipe, and it still came out great. I used sourdough bread instead of French and I added a small handful of finely chopped chives. (Use your discretion.) The chives definitely gave it a little more flavor and the parmesan cheese got nice and bubbly.

I think that as long as you use an artisan, rustic, type bread it will be great. Steer clear of regular sandwich bread or even Texas toast, I think it won’t absorb as much of the milk and egg mixture and be a total mess.

In conclusion – if there’s one recipe you try – try this one. Pegleg sat this one out, because that’s how easy it is. When it comes right out of the oven, it’s puffy, golden, and quite impressive. Then, when you bite into the soft, creamy bread and crunch the golden cheese, you’ll think it took hours to make.

Thursday, June 4, 2009

BBQ Whoopies


Barbeques. A staple in Chicago once the weather gets nice. After at least 6 months of being cooped up inside because of freezing temperatures, everyone is dying to sit outside, have some good food, play some bags, and relax.

A couple weeks ago I had two barbeques to attend, booking my Saturday completely. I was pretty excited because they weren’t just ‘lets hang out and drink some beer’ barbeques, they were ‘Hey! I got my masters!’ and ‘Suddenly, it’s my birthday!’. Events like that, you can’t miss. However, I have been really busy lately and wanted to make something easy, that I was confidant I could make and make well (especially after the peanut butter pie disaster). I decided to try my hand at the Whoopie pies again, only this time, just follow the recipe straight up. They would be full of gluten! All you gluten free birds out there may be a tad disappointed, but the reality is, I’m an equal opportunity baker. Not to mention, it gives it a new spin.

I followed the cake/pie part from the recipe posted in the New York Times a couple months ago. Here’s what it called for:

1 stick of butter (room temperature) – I softened mine
1 cup brown sugar
1 egg
1 tsp vanilla
1 ¼ tsp baking soda
1 tsp sea salt (I used Kosher salt)
2 cups All purpose flour
½ cup cocoa
1 cup buttermilk

Preheat oven to 350 degrees.
Cream the butter and brown sugar.
Add the egg and vanilla and beat until light and creamy.
In a separate bowl, whisk together the baking soda, salt, flour, and cocoa.
Add the dry ingredients to the wet ingredients in 3 parts alternating with buttermilk. Make sure everything combines well before adding more.
Drop the batter on parchment lined baking sheet. I didn’t make the cake/pies as big as before, I made smaller ones, about 2” in diameter. Bake for 12 minutes.

They aren’t as dense as the gluten free pies. They spring back when touched and are slightly more delicate. I had two barbeques to attend on the day I made these so I doubled the recipe and it came out perfect.

One batch I made with a Peanut Butter Buttercream and the other batch I filled with a modified Vanilla Buttercream. (The Peanut Butter Buttercream you can find in my older post.)

The Vanilla Buttercream
½ cup Butter
1 ¾ cup Powdered Sugar
1 TBSP light cream (I substituted 4 TBSP heavy whipping cream)
1 tsp vanilla

Mix all the ingredients together until stiff peaks form. I ran out of powdered sugar, which I would have added a little more of because the frosting wasn’t as thick as I would have liked it. I also would have doubled the recipe, because it just made enough and I used it pretty sparingly.

All in all the glutinous Whoopie Pies were successful and big hits at both barbeques. However, I kind of liked the denseness of the gluten free ones better. These felt a little soggy because they were so soft.

Tuesday, June 2, 2009

The Cosby's Peanut Butter Pie Crust Disaster


My brother, baby sister, and I lost our cable TV privileges when I was 7. I call them privileges because we moved to a new house. Growing up in an underdeveloped country in the late 80’s, before technology took over the universe, if your parents told you that there was no way to get a cable signal in your new house a little outside the main city, even with rabbit ears and tin foil, you believed them. Many years later we found out, that while that may have been true the first year or two of our almost 9 years in the house, it was not the entire truth. My parent’s rationale behind the cable tv, or lack thereof, was that they were tired of having dinner with Bill Cosby and his TV family. While entertaining, especially to a 6 and 4 year old, Rudy’s shenanigans and Cliff’s ridiculous misadventures were not the way my parents wanted to spend every evening for the next 12 years. Not to mention, we were moving out of an apartment into a house with a yard, close to a pool and park, they wanted us to play outside!

So we got out. We devised games during summer vacations where we swung from palm trees and slid down hills in cardboard boxes. We went to the swimming pool, we set up the slip-n-slide, the crocodile mile, the badminton net. We rode bikes, played chase, brought the boom box outside and roller bladed in the street. We perfected fort building and tree climbing.

And then it would rain. We didn’t have the Huxtables to turn to, so we devised new games. We played Cooking Show in my little sisters kitchen and made homemade perfumes in the sink. Maybe that’s where the creativity comes from, or the need to try new things and make things up. That spirit is what filled me when I embarked on probably one of my biggest cooking disasters to date.

As you know, I have this new tart pan that is just begging to be used. For my mother’s birthday I wanted to make something very special. Since she has a wheat aversion, but I wanted to make a pie, I tracked down some very awesome pie crust recipes to put in my tart pan. The idea was going well until I decided to alter these recipes. I know pie crusts are pretty delicate, but where’s the fun if you can’t bend the rules a little bit. So I decided I wanted to make a peanut butter pie crust, since I’m a huge peanut butter fan. Then I was going to fill it with a chocolate mousse. In theory it sounds superb, in reality, I couldn’t even salvage it. It also didn’t help that this genius idea of mine came at about 11 pm and I only had part of the ingredients and decided to substitute the rest.

I’m not even going to post the recipe; it was that terrible. But I will let you in on what went wrong:

First, even though I refrigerated the dough for the appropriate amount of time, it was very sticky; it wouldn’t roll right and was very, very soft and gummy.

Second, I couldn’t even get the dough to stay in the pan. It slid right down the sides and stuck to my fingers.

So I was stuck with this unworkable dough. ‘Let’s improvise!’ I thought. So I decided to try to make some sort of thumbprint cookie that I could then fill with a chocolate something or other. I fashioned these very messy, sticky ‘cookies’. (Cookies is probably a very generous term for whatever these were.) I cooked them for 8 minutes in a 350 degree oven. Then I cooked them for 8 more minutes. They wouldn’t cook all the way through and tasted like cardboard. The only thing I could liken them to was in grade school when you take your handprint and make a Christmas ornament with the flour and salt and then you decorate it, only my cookies were far from that cute or salvageable.

Lessons learned:
1. Combining all sorts of creative ideas in a sink as a child is phenomenal. As an adult, dealing with real, perishable, expensive ingredients, creative ideas are great BUT maybe have some sort of experience with pie crusts before fashioning your own.
2. Peanut butter may not go with everything like I previously thought.

I may have showed up empty handed to my mom’s birthday, but at least she didn’t have to spend her birthday dinner with the Cosby’s.